
Creating lifelike and dynamic arm anatomy drawings can be challenging for artists, yet it’s an essential skill for those wanting to elevate their artistic prowess. To capture the intricacies of arm muscles drawing, you need to understand the anatomy, select the right tools, and apply precise techniques. This guide will equip you with the knowledge to draw muscular arms effectively, ensuring your illustrations resonate with realism and vitality.
With careful study of arm reference drawings and a structured approach, you’ll enhance your ability to portray muscular arms with detail and accuracy. Let’s delve into the essentials, starting with a firm understanding of arm anatomy.
Understanding Arm Anatomy for Drawing
Basic Structure of the Arm
Before you can master arm anatomy drawing, it’s crucial to familiarize yourself with the basic structure. The arm comprises the upper arm, forearm, and hand, with the shoulder connecting it to the torso. Visualizing these segments helps in breaking down complex shapes into manageable parts.
Key Muscles to Focus On
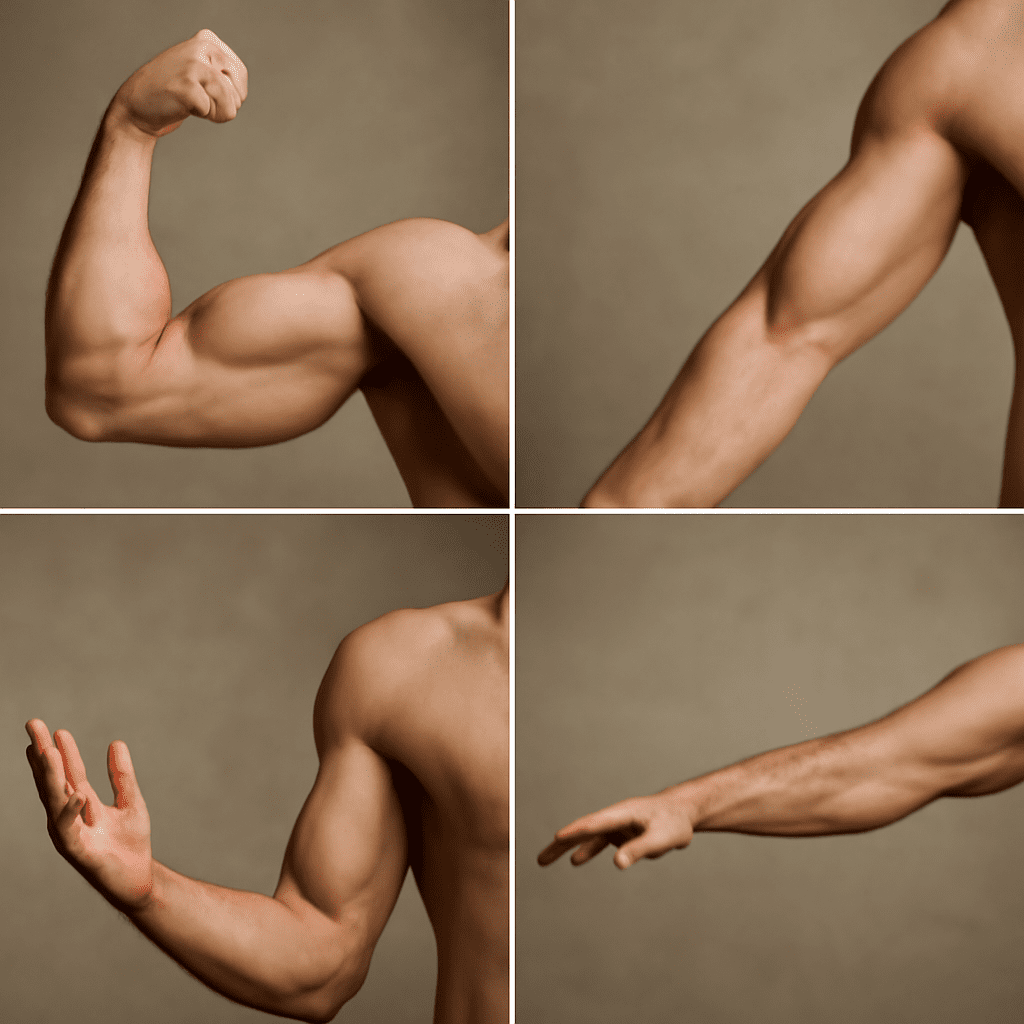
For effective arm muscles drawing, pay attention to the biceps, triceps, and deltoids. These muscles are essential for conveying strength and movement. Understanding their location and function allows you to depict them naturally across various poses.
Essential Tools and Materials for Arm Anatomy Drawing
Recommended Drawing Tools
Successful arm anatomy drawing requires the right tools. Invest in a range of pencils from soft to hard (e.g., 4B to 2H) for shading and detailing. Erasers, blending stumps, and fine liners are also critical to refine edges and enhance textures.
Choosing the Right Paper
Your choice of paper impacts the quality of your arm reference drawing. Opt for a medium-rough texture to hold graphite better and enable smooth blending. A heavy-weight paper can withstand extensive sketching and erasing without tearing.
Step-by-Step Guide: How to Draw Muscular Arms
Sketching the Outline
Begin by sketching the outline of the arm, focusing on proportions and angles. This foundational step in arm anatomy drawing involves light strokes to map out major forms and guide muscle placement.
Adding Muscle Definition
With the framework in place, start adding muscle definition. Use varied pressure to accentuate curves and bulges in the arm muscles drawing, ensuring each muscle group is distinct yet cohesive.
Refining Details
Finally, refine details by enhancing shadows and highlights. Pay attention to light sources and muscle striations. This step adds depth and realism to your arm reference drawing, capturing the subtleties of muscular arms.
Common Mistakes in Arm Reference Drawing and How to Avoid Them
Avoiding common errors can significantly improve your drawings. One frequent mistake is neglecting the underlying bone structure, which can lead to inaccurate muscle placement. Always begin with a skeletal framework to guide your rendering.
Another pitfall is overemphasizing muscle size, which can distort proportions. Maintain balance by studying real-life arm anatomy references. Lastly, inconsistent lighting can flatten your drawing. Ensure consistent light sources to enhance three-dimensionality.
Advanced Tips for Drawing Muscular Arms Like a Pro
To take your arm anatomy drawing to the next level, practice dynamic poses. Capturing movement involves understanding how muscles flex and stretch in action. Explore various angles and perspectives to add energy and life to your illustrations.
Experiment with different textures by using cross-hatching and stippling techniques. These methods can add vibrancy and texture to the skin and muscle surfaces. Finally, habitual critique of your work against arm reference drawings will sharpen your skills over time.
Bottom line: Mastery of arm anatomy drawing requires a blend of anatomical knowledge, the right tools, and practiced techniques. By focusing on these elements, you’ll be able to create impactful and realistic depictions of muscular arms, elevating your drawing abilities to professional levels.